

how to add samples to fl studio
When it comes to making beats in FL Studio, there are literally hundreds of ways to use samples!
In this tutorial, you'll learn a simple method for making sample-based beats.
Now let's get this tutorial started…
Step 1: Prepare your samples for your project
Step one is to find songs or sounds you want to sample.
I recently wrote a guide that covers this strategy in detail.
It covers all the best places to find songs and loops you can download.
Next – once you've downloaded an audio file you want to sample – it's time to create a new FL Studio project.
How to import samples into FL Studio
You'll need to extract the section of the audio file you want to sample.
To do this, we'll use Edison to import the audio.
Open Edison by clicking on its icon in the menu.

Next, import the audio file you downloaded in the previous step.
With the full audio file loaded into Edison, it's time to start sampling.
Use Edison to play the audio file until you find a section of the song you want to sample.
Ideally, you want to find at least 4 bars of music that loop seamlessly.
Once you've found a loop, you can drag along the waveform to highlight it.
After you've highlighted the loop, you can send it to the Playlist.
How to find the tempo of samples in FL Studio
Once the sample is in the Playlist, you'll want to find its tempo.
Finding the tempo is essential. It helps you align the BPM of your project with your sample. This ensures that the elements in your beat are in rhythm.
Here's how you find the tempo:
Start by aligning the sample with the start of the song in the Playlist. Then change your project tempo settings until the loop matches the bars of the grid.
This confirms that your project tempo is in sync with your sample.
Another way to find the BPM of your sample is to use FL Studio's tempo detection feature.
Just right click the waveform icon in the top left corner of the audio file, and click on Detect tempo.

In the new dialog window that pops up, click the option with the widest range.
Then, the software will provide an estimated tempo of the sample.
But sometimes this result is wrong…
Your best bet is to learn how to sync the tempo of your sample to your project. You can learn more about this in the advanced training.
How to find the key of samples in FL Studio
After you've found the tempo, you may want to find the key.
This step requires some basic music theory,and is entirely optional.
To manually find the key of your sample, open a new instance of a simple instrument plugin, like FL Keys, in the channel rack.
Then listen to the loop, and play the notes on your piano roll that make up the chords of the music.
If you're unsure what key makes up the notes, refer to a reference chart.
Step 2: Slice your samples
Now that you have the tempo (and key), it's time to slice and arrange your sample.
Here are your options:
Option #1 is to use the loop as the foundation of your beat.
Option #2 is to chop the loop to create a new pattern.
Let's discuss both…
How to loop samples in FL Studio
If you're satisfied with the loop as it stands, you can repeat it throughout your track.
To loop your samples, use the Paint tool to add new instances of the loop in the Playlist, as many times as you want.
Quick tip…
If you plan to customize the loops, you'll want to make each sample unique.
Otherwise, you'll end up changing ALL the loops in your track.
How to chop samples in FL Studio
If you prefer to chop your loops, you'll want to use a sampler instrument.
Using a sampler, you can split your loops into sections and arrange them into new patterns.
There are several tools you can use to slice your samples, but the most popular choices are Slicex and Fruity Slicer.
In a moment, I'll break down how to get started with each.
But if you want an inside look at the best slicing method for FL Studio… don't forget to check out this resource.
Let's continue…
Slicing samples with Slicex
Slicex is an advanced sampler that comes with FL Studio Producer Edition.
You can use it to chop samples and map the regions to your MIDI controller in the same interface.
It's best for customizing each slice and sampling drum loops.
Here's how to get started with Slicex:
First, create a new Slicex channel in the Channel rack.

With Slicex open, click in the empty area to open your audio file.

With your sample loaded, use your cursor to highlight an area you want to slice.

Next, go to the Regions menu and choose Add region.

A window will pop up to give the region a name. Enter a name (or don't) and press Enter.
You should now see a newly created region like this:

Continue this process for each slice you want to create.
For each region you create, Slicex will map it to your MIDI controller, starting at C5.

Once you've finished creating your regions in Slicex, you can play the slices as MIDI in the piano roll.
Slicing samples with Fruity Slicer
Unlike Slicex, Fruity Slicer is just a sampler instrument, with fewer features.
You can manually slice samples with Fruity Slicer. Instead, you'll need to use its automatic slicing feature.
Here's how it works:
First, open a new instance of Fruity Slicer in the Channel rack.

Next, load the sample by clicking on the sample button, and choosing "load sample". Navigate to the audio file you want to import.

Now it's time to chop the sample.
Click the slicing button and choose from the incremental options.
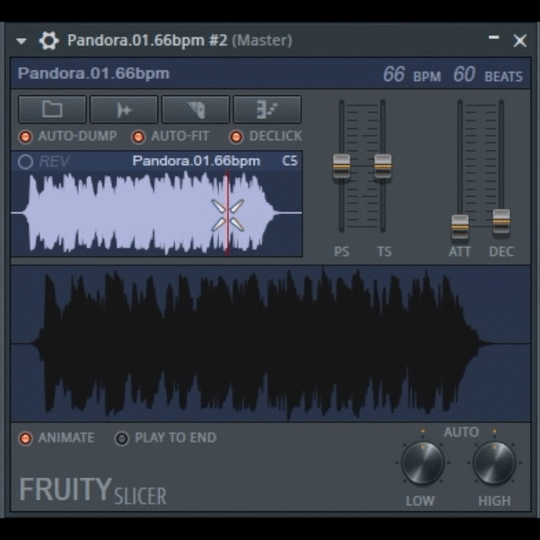
Experiment with the different slicing options to find one that works for your sample.
At this stage, you should have your samples loaded and key mapped to your MIDI keyboard (if you're using one).
Now you can use Fruity Slicer like any other virtual instrument to make your own patterns.
Step 3: Arrange your sample
You've finally made it to the fun part!
With your slices loaded in your sampler, it's time to put your arrangement together.
Draw the notes into your piano roll to find a pattern that fits your beat.
Or play the samples on your midi keyboard while recording into FL Studio.
Experiment with your samples to put your beat together.
Since sampling is the focus of this tutorial, we're going to skip the part where you add to your beat.
This is where you would enhance your arrangement with bass, drums, one-shot vocal samples, sound FX, etc.
Let's move on for some tips to help you improve your sample-based beats.
Tips for improving your samples
You now understand the foundation for sampling in FL Studio. Here are some tips to help you along the way.
Tip #1: Pay attention to the tempo of your samples
One of the keys to sampling is mastering the tempo.
It's not always enough to match your loops to the grid.
Most of the time, you'll need to sync the tempo to your projects – especially when slicing your samples.
To learn more about this advanced strategy, be sure to check out this training.
Tip #2: Make room for the low end
Oftentimes your samples will include elements that detract from the overall mix.
This can lead to tracks that sound busy.
Your best bet is to use EQ to remove unnecessary elements.
But be careful when removing frequencies. Dynamic range is essential in music.

Tip #3: Customize the character of your samples
You might want to add mixing effects to change the feel of the sample.
For example, you can apply reverb, echo or time stretching effects to alter the sample.
Once you've experimented with enough plugins, you'll find particular settings that you like.
Be sure to save your favorite configurations as presets.
As you work, create new mixing channels for your samples, and save your configurations.
how to add samples to fl studio
Source: https://samplehunt.com/how-to-sample-in-fl-studio/
Posted by: laplantwilesire1983.blogspot.com
0 Response to "how to add samples to fl studio"
Post a Comment